Monthly Archives: November 2011

First Digital-Mode QSO!

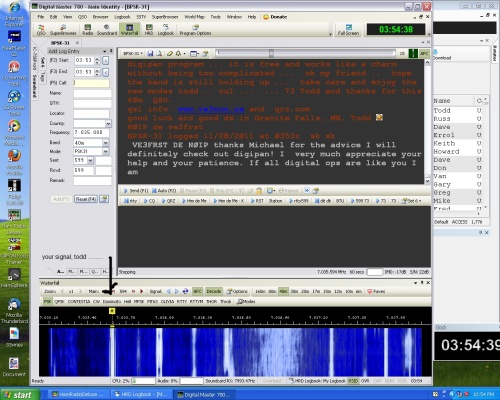
Tonight I made my first digital-mode contact! Using PSK-31, I worked special event station VE3FRST (“UN International Year of Forests”) on 40 meters. Michael, VE3NOO, kindly emailed me this screenshot of the moment:

A few things had me fumbling around, but over the next few contacts I started to get the hang of it. After VE3FRST I went on to work another station in Ontario, one in Alabama, and one in France with PSK-31 before retreating to my key and working Costa Rica with CW.

I highly recommend the DigiMaster PRO PLUS! It comes with a USB soundcard and was very easy to hook up and get going with Ham Radio Deluxe/Digital Master 780. It performs both as a CAT interface and as a data interface, and works great.

I learned the hard way that not all CAT cables are worth buying. Buy cheap, and you’ll buy twice like I did. My first one was a cheap cable from “affordableradio” on ebay. It uses the Prolific chipset for the serial-to-USB interface. Stay away from Prolific! The only thing prolific about it was the prolific number of spontaneous disconnections and “Blue Screen of Death” crashes. I tried everything — every driver I could get my hands on, I/O buffer adjustments, etc. but it was junk. I couldn’t bring myself to sell it to another ham, so I returned it. No refund yet, but here’s hoping.

4 Comments

Filed under Digital Modes

CW Abbreviations

If you’re just getting started with CW, you need to know that learning Morse Code is only part of the puzzle. You’ll also need to learn basic CW Operating Procedures, and you’ll need to know some commonly used abbreviations, too. It wouldn’t be a bad idea to print out something like this and keep it near your key until sending and receiving these are second-nature:

Abbreviation Meaning Example
ABT About ANT 3 EL BEAM UP ABT 40 FT
AGN Again PSE AGN UR NAME?
ANT Antenna ANT DIPOLE UP ABT 50 FT
BURO QSL Bureau PSE QSL VIA BURO
CPY Copy HW CPY?
CU See you CU AT SKYWARN TRAINING
CU AGN See you again 73 HPE CU AGN
CUL See you later 73 HPE CUL
CQ Calling anyone CQ CQ CQ DE NØIP
DE This is station NØBSY DE NØIP KN
DR Dear FB DR TODD (Often heard from DX stations.)
DX Long-distance CQ CQ CQ DX DE NØIP
EL Element ANT 3 EL BEAM UP ABT 40 FT
ES And 73 JOHN GN ES GB U ES URS
FB Fine business FB OM TNX FER RPT
FER For TNX FER NICE CHAT HPE CU AGN
FT Feet ANT DIPOLE UP 60 FT
GA Good afternoon GA OM UR RST 579
GB God bless 73 ES GB
GD Good day GD OM TNX FER CALL
GE Good evening GE OM ES GB
GL Good luck TNX FER QSO 73 GL
GM Good morning GM DIETER TNX FER RPT FROM BERLIN
GN Good night TIME TO HIT THE SACK GN ES TNX FER QSO
GUD Good UR ANT DOING GUD JOB
HI Laugh XYL NEEDS A NEW RIG HI HI
HPE I hope/I hope to HPE CU THIS FRI
HR Here RIG HR HEATHKIT DX-100 ES HAMMARLUND HQ-170A
HW How HW CPY?
NR Near QTH NR MINNEAPOLIS, MN
OB Old Boy TNX QSO OB
OM Old Man TNX FER CALL OM
OP Operator’s Name OP TODD
PSE Please PSE QSY UP 1
PWR Power RIG HR TS-440S PWR ABT 100 W
R Roger (Copy 100%) NØBSY DE NØIP R R FB TOM
RIG Radio equipment RIG HR HW-8
RPT Report (also RPRT) or Repeat TNX FER RPT/RPRT (Repeat: PSE RPT QTH)
SIG Signal UR SIG VY WEAK
SRI Sorry SRI OM MUST GO
TKS Thanks TKS FER QSO (Same as TNX)
TNX Thanks TNX FER QSO (Same as TKS)
TU Thank you NØIP TU 5NN (Typical rapid-fire DXpedition exchange.)
U You NICE TO MEET U
UR Your/You’re UR RST 599
URS Yours GB U ES URS
VERT Vertical ANT VERT UP 20 FT
VY Very UR SIG VY WEAK
W Watt(s) RIG HW-8 PWR ABT 2 W
WID With BEEN WID XYL 24 YRS
WX Weather WX HR COLD ABT 5 F
YL Young lady FB YL HPE CUL
YR Year CU NEXT YR AT DAYTON
YRS Years BEEN HAM 33 YRS
XYL Wife (Ex-young-lady) XYL CALLING MUST GO
72 Best regards (QRP) UR K2 DOING GUD 72 OM ES GB
73 Best regards TU 73 CUL

2 Comments

Filed under CW, Operating Practice & Procedure

Electronics Learning Lab

I haven’t posted in a while because I’ve needed to get caught up since the antenna-project, and whatever time I have had for ham radio I’ve spent on the air! It’s been a blast, too — lately the DX has been like low-hanging fruit. I’ve especially enjoyed DX on 40m. But my son and I started something this week that is too good to keep to myself, so here I am blogging again.

My good friend and brother in Christ, Scott Paulson, spoke highly of Radio Shack’s “Electronics Learning Lab.” As a signalman for BNSF Railway he is constantly going off to school to learn about electronics, and the Electronics Learning Lab is required for his classes. (By the way, guess what one of their textbooks is? The ARRL Handbook!) So this week I dropped by Radio Shack, took a look, and promptly bought the thing to add to my son’s homeschool curriculum.

My son and I both love the Electronics Learning Lab! I have to admit that I’m going to be learning right alongside him. All of this stuff I’ve studied, of course, or I wouldn’t have my ham radio license. But with this breadboard-work I’m applying the stuff I’ve learned, some of it for the first time. And there’s nothing like fiddling with a circuit on a breadboard, swapping out this resistor for that, this capacitor for that, etc. to get an intuitive grasp of this stuff. Flipping through the workbooks to see what’s in store for us, I began to think that maybe, just maybe, I might actually be able to design some basic circuits myself instead of just building them from kits. (For crying out loud, that’s a skill Amateur Extra’s are supposed to have!)

The Electronics Learning Lab comes with two workbooks that guide you through over 200 projects:

Click on each manual to view the PDF at radioshack.com.

Just as Scott told me, “It’s like painting by number.” We only started on it yesterday, yet this morning I found my son working on the next project all by himself, so comfortable was he with the directions in the workbook. I jumped in so I could learn, too. After he finished today’s project we wanted to keep going, but exercised self-control and put it away until next time.

As a homeschooling father and as an Elmer I’d pay double what Radio Shack is asking for this kit. And no, I don’t work for Radio Shack, nor do any of my friends or relatives, nor do I get one red cent from them for lauding one of their products. Whatever your age, if you want to graduate from kit-building to circuit-design, this seems like a good way to take a step in that direction.

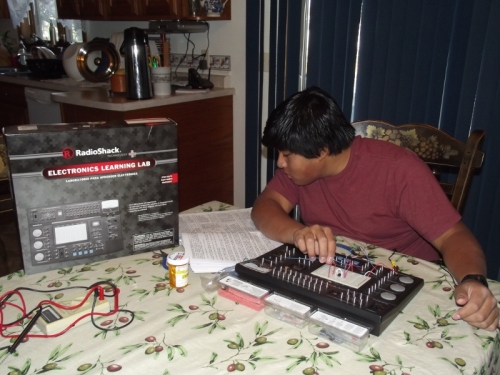
Antonio following the workbook.


Antonio breadboarding with the Electronics Learning Lab.

3 Comments

Filed under Elmering

Reflecting Upon a 33-year-old Written Logbook, Now Completed

A couple days ago I made my last entry in the logbook I’ve been using for 33 years. The log has grown up with me and is a bit battered, much like its owner. The first entry I made was on 9/10/78, back when I was a 10-year-old Novice with the call KAØCEM.

It’s a trip down memory lane to page through this logbook, not only to read the entries and the notes I made about changes in my equipment and QTH, but even to see how my handwriting changed over the years. But it’s full now, so it is time to start another logbook.

The first page of my logbook when I was KAØCEM.

I happen to have a nice, new logbook just waiting for the next hand-written entry. Somewhere along the line I acquired it and it’s been on my shelf waiting for the day my first logbook filled up. But now I’m not so sure I want to use it. Things are different now. Back in the day we relied exclusively on QSL cards to confirm our contacts, but now some folks rely on the Logbook of the World — as a courtesy to them I started entering my contacts there this year. But double-logging is as prone to error as it is time-consuming. And as much as I love the nostalgia of the hand-written log, I have to admit that logbook in Ham Radio Deluxe is mighty slick.

So I’ve ordered the chips to upgrade my Kenwood TS-440S, a CAT cable to hook it up to my computer, and from now on it’s a computerized logbook for me.

But one thing is nagging me. There are unanticipated consequences of “progress” like this. For instance, this computerized logbook has a window with constantly-updated DX spots. Nice, huh? But with this instantaneous feedback-loop that we’ve created, it has become harder and harder to have meaningful QSOs with DX stations — as soon as one is spotted there’s a massive pile-up that turns subsequent QSOs into rapid-fire exchanges that consist of nothing more than NØIP 599 TU.

I’m glad my ol’ logbook ended with a better QSO than that. I called CQ DX on 20m and LU1MA responded from Argentina. We didn’t exactly have a ragchew, but at least it lasted for six whole minutes. The second I signed off with him, though, a horde descended upon him like a swarm of thirsty mosquitoes.

I don’t remember that ever happening in the old days, even though there were more CW operators on the air back then. Back at the peak of the third-to-last sunspot cycle I had DX QSOs that routinely lasted 10-15 minutes, sometimes longer. That wasn’t because my CW was slow. Back then I was around 20 WPM; now I’m down to 15 WPM (it’s coming back, though!). It was simply different back then, and I would say it was better. I loved how the DX stations used to call me DR TODD; I’d hear it from more than one country, but never from the USA. We talked with each other back then, no matter how far away the DX station was.

So I’m not sure I’ll keep that DX spot window open in my new computerized logbook. I’m not even sure I’ll enter pile-ups all that much. I’ve learned how to do it, but it’s tedious and not nearly as rewarding as the contacts I used to have with these DX stations. Maybe I’ll call CQ DX more often and hope the fellow on the other end is willing to spend a few more minutes in QSO than he’s used to.

But when I do, he’ll go into my computer. Along with the old days, my written logbook is a thing of the past.

5 Comments

Filed under History, Operating Practice & Procedure

Lessons Learned During Antenna Construction

I learned a few lessons — the hard way — while building this New Carolina Windom. At risk of making myself look like an idiot I’ll share some of them with you here so that you can learn from my mistakes.

You might wonder how a guy who has been a ham for 33 years could be so ignorant about some of these things, but understand that up until this project I had never even put up an outdoor antenna on my own. My dad was the one who did all this when I was a kid. When I became a homeowner, all my antennas were indoor, stealthy antennas located in my attic — a whole different ballgame. That doesn’t work in my current house, so for the first time I’ve had to build up an outdoor antenna-system.

Anyhow, here they are (in no particular order):

  • Drilling holes in masts: Use a titanium bit. It’s worth the money! I used lesser bits at first, to my frustration. Titanium bits cut through aluminum like a hot knife through soft butter, and they make short work of steel, too. If you’re drilling anywhere but in a workshop, make sure you put down newspaper or something to catch the metal shavings; metal shavings do not contribute to a “barefoot lawn!” Also, build a good jig if you’re drilling all the way through the mast. The jig I built did a good job of holding the mast in place but next time I’ll improve it with a guide that ensures top-dead-center and (in lieu of a drill-press) perfectly perpendicular drilling.
  • Cutting & handling antenna wire: Be generous when cutting the legs of your antenna. I thought I was generous, but when it came time to make my final adjustment (after SWR testing) I could have used just a few more inches than the extra 15″ I had allowed myself on the long leg of my New Carolina Windom. And when handling 14 AWG copperweld, watch out for kinks! As hard as I tried, I came mighty close more than once to putting a bad kink in that unwieldy stuff.
  • Erecting masts: Use a level to make sure the mast is vertical. I know, DUH! I did use a level when I put the tripods up, but when it came time to put the masts in I had forgotten to bring it up on the roof with me. It was just too tempting to pop them in without checking to see that they were perfectly vertical. I found out the hard way that a mast can be tilted quite a bit and still look perfect when peering up its length!
  • Working safely on the roof: Use a safety-line. The first time I went up on my roof I was surprised at how much steeper it was than the one I used to scramble around as a kid. Frankly I was scared stiff up there, especially with this bum leg of mine. I’ve heard there are safety harnesses out there, but I couldn’t find one. So what I did was to throw a safety-line over the roof and tie it off to something stout. That at least gave me some added security on the side of the roof opposite the attach-point. Just make sure your rope is strong and your knots are good!
  • Soldering wire on the roof: Buy or borrow a butane soldering iron. I found out the hard way that even a 100 watt soldering gun is useless at the end of a long extension cord. It worked fine for soldering lugs onto the end of my 14 AWG copperweld, but not for soldering the same wire twisted onto itself. And a regular propane torch is definitely not the right tool for the job (I know, I tried!). Also, you might want a drop-cloth up there. By the time I was done with the job using a propane torch (you should have seen it — it was pretty comical), I had more than one solder-drip on the shingles.
  • Waterproofing coaxial connectors: Use coax-seal or self-amalgamating tape. As I mentioned in my earlier post on this subject, I at first just used electrical tape to wrap my coaxial connectors. After being persuaded by several kind hams who posted comments on that post, I ordered some coax-seal. It’s a good thing I did; I am grateful to those hams for their good advice. When the shipment arrived, I went up on the roof to discover one of my nice pretty tape-jobs already coming apart at the seams after less than two weeks! By the way I found out that five feet of 1/2″ coax-seal is good for only three connections, at least the way I wrapped them.
  • Using pulleys: Use big enough rope. The first time I hoisted my antenna the rope was too small; it quickly jumped off the pulley and got jammed between the pulley and the housing. Fortunately I got it free. I swapped out the thin rope for something much stouter, and now it will never get stuck. (By the way, I’ve read one ham’s advice not to use pulleys at all but ceramic egg-insulators instead; there’s nothing for the rope to get stuck on and they’re durable enough that he’s been using one as a pulley for 20 years.)
  • Allowing for radials: Build in an attach-point for radials at the base of your RF choke if you’re building a New Carolina Windom. Only after my antenna was complete did I read about the benefits of adding radials to this antenna. There is no good way that I can think of for me to connect radials directly to the coaxial connection. Next time I build an RF choke I’ll provide some lugs (or a plate or something) on one end for this purpose.
  • Testing SWR: Make sure you hoist your antenna all the way up before testing its performance. I tried testing my antenna before climbing up on the roof — my son held the mast upright and I tied the legs of the antenna off as high as I could to nearby trees, but the SWR was just too high on 40 meters due to the proximity of the antenna to the ground.
  • Throwing lines: If you have trouble throwing a line, try a heavier weight at the end. I now know that throwing lines is an art. At various points in this project I experimented with a sling-shot, potato-gun, and throwing by hand. Each of these techniques has its place. At one point the best way for us to get a line where we wanted it to go was by simply whirling a weight and letting it fly — but only after we figured out that we needed a good heavy weight at the end. At first I used just a few ounces of metal, but it kept getting hung up in the branches we were penetrating. Once we switched to a pop bottle full of water, it worked on the first try.
  • Pounding ground rods: Put your connectors on the ground rod before pounding it all the way in, if they’re the kind of connectors you have to slip on over the top of the ground rod. By the time I was done pounding in my 8-foot ground rod, the top was so flattened out I couldn’t get the one-piece connector over the top. (An angle-grinder solved the problem; I cut off the top and slipped the connector on.)

No doubt some of these lessons I’ve only partially learned (and maybe some of them I haven’t learned well at all). If you have any better suggestions, or if you have some of your own hard-won lessons you’d like to add, fire away. If we can learn from each other here, maybe we won’t have to learn quite as many lessons the hard way!

4 Comments

Filed under Antennas, New Carolina Windom