ARES® in a Small Town

I’m afraid I haven’t spend much time on the air lately, because what time I have for ham radio has been devoted to a project that began as an idea for a blog post and has grown . . . and grown . . . and grown! I hope to write it all up when everything comes together, but I don’t want to give it away just yet. For now I’ll just give you a few clues: I’ve been assembling some test equipment, including an inductance-capacitance meter kit and a signal generator kit, and I received a tantalizing shipment in the mail today from a fellow who wrote a stellar article in QST 31 years ago. Stay tuned!

On another front, I finally got to meet a local ham who is the IT manager at the hospital in our small town (population ~3K) — Mr. Andrew Rosenau, KCØYFY. I’ve been meaning to introduce myself to him ever since moving out here, but when I found out a few days ago that he is our county’s ARES® (Amateur Radio Emergency Services®) Emergency Coordinator, I sent him an email right away. He replied immediately, and today, after wrapping up a meeting in another part of the hospital, I ambled over and chatted with him for a few minutes in his office.

Behind him on his desk sat an HF rig, a 2M rig, and a TNC. Andy explained that he was a ham before moving here, and he got involved with ARES® when the hospital became interested in EmComm. But with so few hams in our area (only 14 in the whole county), there hasn’t been much in the way of ARES® activity. I volunteered to do what I could, and he said that for starters I could act as a back-up operator there at his station if he were unavailable in time of need.

It turns out that Minnesota has a huge packet network, and a radio club in a nearby town has even installed an antenna right in our city to extend this network. That was news to me! I’m going to have to dig up my old TNC and see if I can get it running. As much as I prefer CW, I have to admit that it does seem like an excellent way to handle traffic in an emergency.

ARES® has always interested me. I’ve never been involved in it before, back when I lived in the Twin Cities, but now I think I owe it to my community. It appears that while there is less opportunity to do much ARES® work out here in the sticks, there is also more opportunity for one ham to make a difference. So far Andy has been all alone in his effort — if even one ham chips in, that would double the number of ARES® operators in our county.

Andy’s wife is a ham, too! I hope to have them over for dinner one of these days and get to know them better.

1 Comment

Filed under ARES®

War of the Worlds, CW Edition

For some time now I’ve been nibbling away at H. G. Wells’ book, War of the Worlds — in CW! It is available along with several other books at the SKCC CW Learning Page. What a blast! It’s an effective way to improve your code speed, and it is so captivating that you want to keep coming back to it to find out what happens next. Somehow the story is all the more gripping as it unfolds slowly, letter by letter, giving you ample time to imagine the scenes that Wells describes.

Each chapter is one word-per-minute faster than the last one. So while it starts at a mere 10 WPM, if you finish the book you’ll be copying 36 WPM!

A couple other features are helpful, too. For one thing it has punctuation marks that I’ve never learned before. It’s not everyday that you hear hyphens on the air, and the first time you hear an apostrophe or quotation-mark it will throw you for a loop. But you learn them quickly enough.

Another thing I like is that Wells uses some expressions that are a bit antiquated. This helps keep you on your toes. On the air, it can be a help to anticipate the next word, but it can also be a hindrance — if you don’t hear what you expect to hear, it can take just enough milliseconds to get over the surprise that the whole word “rushes by like a freight train” (as my friend Keith describes code when it suddenly becomes opaque). By listening to War of the Worlds on CW, with its occasionally unfamiliar turns of phrase, you learn to temper your expectation so that you’re not thrown off.

All in all it’s a great way to hone your skills, and it’s way more enjoyable than the dry practice tapes I listened to ‘way back when!

Thank you to SKCC and especially to John Dunlap, KF7BYU, for making this book available!

Update: One ham has asked me for help on this. Currently the only way to listen to the files at http://www.skccgroup.com/learn/learn.php is to click on them one at a time, either listening to them one at a time online or right-clicking each one and saving them one at a time to put together in a playlist on your computer (That’s what I did, and it was a bit tedious.). If you would like to download a zipped file of the whole book, send me an email at N0IP@arrl.net and I’ll give you the link for as long as I can spare the disk space to keep the zipped file online.

Leave a comment

Filed under CW

First Digital-Mode QSO!

Tonight I made my first digital-mode contact! Using PSK-31, I worked special event station VE3FRST (“UN International Year of Forests”) on 40 meters. Michael, VE3NOO, kindly emailed me this screenshot of the moment:

A few things had me fumbling around, but over the next few contacts I started to get the hang of it. After VE3FRST I went on to work another station in Ontario, one in Alabama, and one in France with PSK-31 before retreating to my key and working Costa Rica with CW.

I highly recommend the DigiMaster PRO PLUS! It comes with a USB soundcard and was very easy to hook up and get going with Ham Radio Deluxe/Digital Master 780. It performs both as a CAT interface and as a data interface, and works great.

I learned the hard way that not all CAT cables are worth buying. Buy cheap, and you’ll buy twice like I did. My first one was a cheap cable from “affordableradio” on ebay. It uses the Prolific chipset for the serial-to-USB interface. Stay away from Prolific! The only thing prolific about it was the prolific number of spontaneous disconnections and “Blue Screen of Death” crashes. I tried everything — every driver I could get my hands on, I/O buffer adjustments, etc. but it was junk. I couldn’t bring myself to sell it to another ham, so I returned it. No refund yet, but here’s hoping.

4 Comments

Filed under Digital Modes

CW Abbreviations

If you’re just getting started with CW, you need to know that learning Morse Code is only part of the puzzle. You’ll also need to learn basic CW Operating Procedures, and you’ll need to know some commonly used abbreviations, too. It wouldn’t be a bad idea to print out something like this and keep it near your key until sending and receiving these are second-nature:

Abbreviation Meaning Example
ABT About ANT 3 EL BEAM UP ABT 40 FT
AGN Again PSE AGN UR NAME?
ANT Antenna ANT DIPOLE UP ABT 50 FT
BURO QSL Bureau PSE QSL VIA BURO
CPY Copy HW CPY?
CU See you CU AT SKYWARN TRAINING
CU AGN See you again 73 HPE CU AGN
CUL See you later 73 HPE CUL
CQ Calling anyone CQ CQ CQ DE NØIP
DE This is station NØBSY DE NØIP KN
DR Dear FB DR TODD (Often heard from DX stations.)
DX Long-distance CQ CQ CQ DX DE NØIP
EL Element ANT 3 EL BEAM UP ABT 40 FT
ES And 73 JOHN GN ES GB U ES URS
FB Fine business FB OM TNX FER RPT
FER For TNX FER NICE CHAT HPE CU AGN
FT Feet ANT DIPOLE UP 60 FT
GA Good afternoon GA OM UR RST 579
GB God bless 73 ES GB
GD Good day GD OM TNX FER CALL
GE Good evening GE OM ES GB
GL Good luck TNX FER QSO 73 GL
GM Good morning GM DIETER TNX FER RPT FROM BERLIN
GN Good night TIME TO HIT THE SACK GN ES TNX FER QSO
GUD Good UR ANT DOING GUD JOB
HI Laugh XYL NEEDS A NEW RIG HI HI
HPE I hope/I hope to HPE CU THIS FRI
HR Here RIG HR HEATHKIT DX-100 ES HAMMARLUND HQ-170A
HW How HW CPY?
NR Near QTH NR MINNEAPOLIS, MN
OB Old Boy TNX QSO OB
OM Old Man TNX FER CALL OM
OP Operator’s Name OP TODD
PSE Please PSE QSY UP 1
PWR Power RIG HR TS-440S PWR ABT 100 W
R Roger (Copy 100%) NØBSY DE NØIP R R FB TOM
RIG Radio equipment RIG HR HW-8
RPT Report (also RPRT) or Repeat TNX FER RPT/RPRT (Repeat: PSE RPT QTH)
SIG Signal UR SIG VY WEAK
SRI Sorry SRI OM MUST GO
TKS Thanks TKS FER QSO (Same as TNX)
TNX Thanks TNX FER QSO (Same as TKS)
TU Thank you NØIP TU 5NN (Typical rapid-fire DXpedition exchange.)
U You NICE TO MEET U
UR Your/You’re UR RST 599
URS Yours GB U ES URS
VERT Vertical ANT VERT UP 20 FT
VY Very UR SIG VY WEAK
W Watt(s) RIG HW-8 PWR ABT 2 W
WID With BEEN WID XYL 24 YRS
WX Weather WX HR COLD ABT 5 F
YL Young lady FB YL HPE CUL
YR Year CU NEXT YR AT DAYTON
YRS Years BEEN HAM 33 YRS
XYL Wife (Ex-young-lady) XYL CALLING MUST GO
72 Best regards (QRP) UR K2 DOING GUD 72 OM ES GB
73 Best regards TU 73 CUL

2 Comments

Filed under CW, Operating Practice & Procedure

Electronics Learning Lab

I haven’t posted in a while because I’ve needed to get caught up since the antenna-project, and whatever time I have had for ham radio I’ve spent on the air! It’s been a blast, too — lately the DX has been like low-hanging fruit. I’ve especially enjoyed DX on 40m. But my son and I started something this week that is too good to keep to myself, so here I am blogging again.

My good friend and brother in Christ, Scott Paulson, spoke highly of Radio Shack’s “Electronics Learning Lab.” As a signalman for BNSF Railway he is constantly going off to school to learn about electronics, and the Electronics Learning Lab is required for his classes. (By the way, guess what one of their textbooks is? The ARRL Handbook!) So this week I dropped by Radio Shack, took a look, and promptly bought the thing to add to my son’s homeschool curriculum.

My son and I both love the Electronics Learning Lab! I have to admit that I’m going to be learning right alongside him. All of this stuff I’ve studied, of course, or I wouldn’t have my ham radio license. But with this breadboard-work I’m applying the stuff I’ve learned, some of it for the first time. And there’s nothing like fiddling with a circuit on a breadboard, swapping out this resistor for that, this capacitor for that, etc. to get an intuitive grasp of this stuff. Flipping through the workbooks to see what’s in store for us, I began to think that maybe, just maybe, I might actually be able to design some basic circuits myself instead of just building them from kits. (For crying out loud, that’s a skill Amateur Extra’s are supposed to have!)

The Electronics Learning Lab comes with two workbooks that guide you through over 200 projects:

Click on each manual to view the PDF at radioshack.com.

Just as Scott told me, “It’s like painting by number.” We only started on it yesterday, yet this morning I found my son working on the next project all by himself, so comfortable was he with the directions in the workbook. I jumped in so I could learn, too. After he finished today’s project we wanted to keep going, but exercised self-control and put it away until next time.

As a homeschooling father and as an Elmer I’d pay double what Radio Shack is asking for this kit. And no, I don’t work for Radio Shack, nor do any of my friends or relatives, nor do I get one red cent from them for lauding one of their products. Whatever your age, if you want to graduate from kit-building to circuit-design, this seems like a good way to take a step in that direction.

Antonio following the workbook.


Antonio breadboarding with the Electronics Learning Lab.

3 Comments

Filed under Elmering

Reflecting Upon a 33-year-old Written Logbook, Now Completed

A couple days ago I made my last entry in the logbook I’ve been using for 33 years. The log has grown up with me and is a bit battered, much like its owner. The first entry I made was on 9/10/78, back when I was a 10-year-old Novice with the call KAØCEM.

It’s a trip down memory lane to page through this logbook, not only to read the entries and the notes I made about changes in my equipment and QTH, but even to see how my handwriting changed over the years. But it’s full now, so it is time to start another logbook.

The first page of my logbook when I was KAØCEM.

I happen to have a nice, new logbook just waiting for the next hand-written entry. Somewhere along the line I acquired it and it’s been on my shelf waiting for the day my first logbook filled up. But now I’m not so sure I want to use it. Things are different now. Back in the day we relied exclusively on QSL cards to confirm our contacts, but now some folks rely on the Logbook of the World — as a courtesy to them I started entering my contacts there this year. But double-logging is as prone to error as it is time-consuming. And as much as I love the nostalgia of the hand-written log, I have to admit that logbook in Ham Radio Deluxe is mighty slick.

So I’ve ordered the chips to upgrade my Kenwood TS-440S, a CAT cable to hook it up to my computer, and from now on it’s a computerized logbook for me.

But one thing is nagging me. There are unanticipated consequences of “progress” like this. For instance, this computerized logbook has a window with constantly-updated DX spots. Nice, huh? But with this instantaneous feedback-loop that we’ve created, it has become harder and harder to have meaningful QSOs with DX stations — as soon as one is spotted there’s a massive pile-up that turns subsequent QSOs into rapid-fire exchanges that consist of nothing more than NØIP 599 TU.

I’m glad my ol’ logbook ended with a better QSO than that. I called CQ DX on 20m and LU1MA responded from Argentina. We didn’t exactly have a ragchew, but at least it lasted for six whole minutes. The second I signed off with him, though, a horde descended upon him like a swarm of thirsty mosquitoes.

I don’t remember that ever happening in the old days, even though there were more CW operators on the air back then. Back at the peak of the third-to-last sunspot cycle I had DX QSOs that routinely lasted 10-15 minutes, sometimes longer. That wasn’t because my CW was slow. Back then I was around 20 WPM; now I’m down to 15 WPM (it’s coming back, though!). It was simply different back then, and I would say it was better. I loved how the DX stations used to call me DR TODD; I’d hear it from more than one country, but never from the USA. We talked with each other back then, no matter how far away the DX station was.

So I’m not sure I’ll keep that DX spot window open in my new computerized logbook. I’m not even sure I’ll enter pile-ups all that much. I’ve learned how to do it, but it’s tedious and not nearly as rewarding as the contacts I used to have with these DX stations. Maybe I’ll call CQ DX more often and hope the fellow on the other end is willing to spend a few more minutes in QSO than he’s used to.

But when I do, he’ll go into my computer. Along with the old days, my written logbook is a thing of the past.

5 Comments

Filed under History, Operating Practice & Procedure

Lessons Learned During Antenna Construction

I learned a few lessons — the hard way — while building this New Carolina Windom. At risk of making myself look like an idiot I’ll share some of them with you here so that you can learn from my mistakes.

You might wonder how a guy who has been a ham for 33 years could be so ignorant about some of these things, but understand that up until this project I had never even put up an outdoor antenna on my own. My dad was the one who did all this when I was a kid. When I became a homeowner, all my antennas were indoor, stealthy antennas located in my attic — a whole different ballgame. That doesn’t work in my current house, so for the first time I’ve had to build up an outdoor antenna-system.

Anyhow, here they are (in no particular order):

  • Drilling holes in masts: Use a titanium bit. It’s worth the money! I used lesser bits at first, to my frustration. Titanium bits cut through aluminum like a hot knife through soft butter, and they make short work of steel, too. If you’re drilling anywhere but in a workshop, make sure you put down newspaper or something to catch the metal shavings; metal shavings do not contribute to a “barefoot lawn!” Also, build a good jig if you’re drilling all the way through the mast. The jig I built did a good job of holding the mast in place but next time I’ll improve it with a guide that ensures top-dead-center and (in lieu of a drill-press) perfectly perpendicular drilling.
  • Cutting & handling antenna wire: Be generous when cutting the legs of your antenna. I thought I was generous, but when it came time to make my final adjustment (after SWR testing) I could have used just a few more inches than the extra 15″ I had allowed myself on the long leg of my New Carolina Windom. And when handling 14 AWG copperweld, watch out for kinks! As hard as I tried, I came mighty close more than once to putting a bad kink in that unwieldy stuff.
  • Erecting masts: Use a level to make sure the mast is vertical. I know, DUH! I did use a level when I put the tripods up, but when it came time to put the masts in I had forgotten to bring it up on the roof with me. It was just too tempting to pop them in without checking to see that they were perfectly vertical. I found out the hard way that a mast can be tilted quite a bit and still look perfect when peering up its length!
  • Working safely on the roof: Use a safety-line. The first time I went up on my roof I was surprised at how much steeper it was than the one I used to scramble around as a kid. Frankly I was scared stiff up there, especially with this bum leg of mine. I’ve heard there are safety harnesses out there, but I couldn’t find one. So what I did was to throw a safety-line over the roof and tie it off to something stout. That at least gave me some added security on the side of the roof opposite the attach-point. Just make sure your rope is strong and your knots are good!
  • Soldering wire on the roof: Buy or borrow a butane soldering iron. I found out the hard way that even a 100 watt soldering gun is useless at the end of a long extension cord. It worked fine for soldering lugs onto the end of my 14 AWG copperweld, but not for soldering the same wire twisted onto itself. And a regular propane torch is definitely not the right tool for the job (I know, I tried!). Also, you might want a drop-cloth up there. By the time I was done with the job using a propane torch (you should have seen it — it was pretty comical), I had more than one solder-drip on the shingles.
  • Waterproofing coaxial connectors: Use coax-seal or self-amalgamating tape. As I mentioned in my earlier post on this subject, I at first just used electrical tape to wrap my coaxial connectors. After being persuaded by several kind hams who posted comments on that post, I ordered some coax-seal. It’s a good thing I did; I am grateful to those hams for their good advice. When the shipment arrived, I went up on the roof to discover one of my nice pretty tape-jobs already coming apart at the seams after less than two weeks! By the way I found out that five feet of 1/2″ coax-seal is good for only three connections, at least the way I wrapped them.
  • Using pulleys: Use big enough rope. The first time I hoisted my antenna the rope was too small; it quickly jumped off the pulley and got jammed between the pulley and the housing. Fortunately I got it free. I swapped out the thin rope for something much stouter, and now it will never get stuck. (By the way, I’ve read one ham’s advice not to use pulleys at all but ceramic egg-insulators instead; there’s nothing for the rope to get stuck on and they’re durable enough that he’s been using one as a pulley for 20 years.)
  • Allowing for radials: Build in an attach-point for radials at the base of your RF choke if you’re building a New Carolina Windom. Only after my antenna was complete did I read about the benefits of adding radials to this antenna. There is no good way that I can think of for me to connect radials directly to the coaxial connection. Next time I build an RF choke I’ll provide some lugs (or a plate or something) on one end for this purpose.
  • Testing SWR: Make sure you hoist your antenna all the way up before testing its performance. I tried testing my antenna before climbing up on the roof — my son held the mast upright and I tied the legs of the antenna off as high as I could to nearby trees, but the SWR was just too high on 40 meters due to the proximity of the antenna to the ground.
  • Throwing lines: If you have trouble throwing a line, try a heavier weight at the end. I now know that throwing lines is an art. At various points in this project I experimented with a sling-shot, potato-gun, and throwing by hand. Each of these techniques has its place. At one point the best way for us to get a line where we wanted it to go was by simply whirling a weight and letting it fly — but only after we figured out that we needed a good heavy weight at the end. At first I used just a few ounces of metal, but it kept getting hung up in the branches we were penetrating. Once we switched to a pop bottle full of water, it worked on the first try.
  • Pounding ground rods: Put your connectors on the ground rod before pounding it all the way in, if they’re the kind of connectors you have to slip on over the top of the ground rod. By the time I was done pounding in my 8-foot ground rod, the top was so flattened out I couldn’t get the one-piece connector over the top. (An angle-grinder solved the problem; I cut off the top and slipped the connector on.)

No doubt some of these lessons I’ve only partially learned (and maybe some of them I haven’t learned well at all). If you have any better suggestions, or if you have some of your own hard-won lessons you’d like to add, fire away. If we can learn from each other here, maybe we won’t have to learn quite as many lessons the hard way!

4 Comments

Filed under Antennas, New Carolina Windom

Estonia on 30m, and Antenna-Days 3-5 in My Son’s Words

This antenna works great! In my earlier post I mentioned that SWR was high on 30m, but last night I let the automatic tuner on the TS-440S match it — and ES3AX gave me a 579 from Estonia! 4Z5MU (Israel) went into the logbook last night, too, but that was on 20m.

A couple weeks ago I published my son’s take on Antenna-Days #1 and #2. Here is his take on the rest of the project:

Helping Dad Build His Antenna, Days 3-5
by Antonio Mitchell, October 20, 2011

Building the antenna has taken a bit. It has been fun for the most part. We finally have it almost finished. The past couple days have been really busy. I hope that I can remember them so that I may provide my readers with an understanding of what we did.

It was pretty chilly on Monday. The wind was blowing pretty hard so we did not get to go on the roof. We spent the day getting the antenna wire cut and put onto the balun. Once we were done with putting the antenna wire on the balun my dad had to put it on to the pulley attached to the aluminum pole. My dad and I put the pole against the house and took the two ends of the antenna wire and tied ropes to them. After that we took the ropes and tied them to some trees. It was so windy that it was hard to hold the pole. While I was holding the pole my dad took the SWR meter and tried to figure out if he needed to add or take away some wire from the connectors on the balun. It did not work so well. [Being so close to the ground, SWR was sky-high on 40m.] We took the pole and the ropes down and called it a day.

On Tuesday we first shot a weight over the house so that we could get a safety line over the house. The safety line was for when Dad went on the roof. It took us quite a few tries to get it over the house. Once the line was over we attempted to put a line over the tree which is where one end of the antenna wire is going to sit. Using my slingshot did not work. My dad went up to Runnings to get ground wire and PVC pipe to build a potato launcher. It took him a little while to find all of it. When he came home we assembled the potato launcher. After supper we tried to get a line over the tree, but it was dark and windy. We did launch a potato with a screw in it. It did not go over the tree because of the wind. It went over a couple trees. We could not find the potato.

Wednesday we did manage to find the potato. We had to cut some of the line we used. My dad decided he would get the line into the tree when he was on the roof. A friend of my dad came over and helped put the aluminum pole with the antenna attached and the other pole into the tripods. The antenna is finally up! My dad just has a few final touches to do and then it will be up there for good I hope. Last night my dad was able to talk to some people on the air using the antenna that is now on the roof.

1 Comment

Filed under New Carolina Windom

Update on New Carolina Windom

Dale and I stringing the long leg of the New Carolina Windom.


Well, it’s almost done! The antenna is in place, optimized, and operational. Last night my son helped me finalize the connections at the ground rod and string the coax and ground wire into the house. There are only a couple of details to take care of before winter sets in, but they shouldn’t take much time — I hope to be done with them by next Monday’s end if not sooner. I hope to find time soon to write up some of the lessons I learned.

I couldn’t have done it without the help of my son Antonio and my friend Dale (“half squirrel, half monkey”), not to mention the encouragement my wife kept giving me. My son was my constant companion, “go-fer,” and an indispensible helper on many tasks. And Dale might have saved my life since I’ve no business being on the roof with a bum leg. He did the lion’s share of the work up there the day we put up the masts and the antenna. He’s so good on a roof I think he could have run laps around the perimeter, while I clung for dear life to a safety line when getting on and off the ladder.

SWR is below 2:1 across all of 40m, 20m, 17m and 10m (except for the first 100 KHz of 10m, but even there it’s still below 3:1). It’s high on 30m, 15m, and 12m, but I’ve read that this can be improved by running radials from the bottom of the RF choke. I’ll let you know how that works.

Last night I made one contact after tidying up the connections in the shack: TX7M, a DXpedition in the Marquesas Islands, French Polynesia. That was a first for me, working a DXpedition. It was decidedly unsatisfying — the ultimate antithesis of a ragchew with a worthless signal report (just a recorded “599” that goes to everybody, regardless of their true readability, strength, and tone). But it was still encouraging, especially since it was on 17m, a band I’ve never even touched before I built this antenna.

Leave a comment

Filed under New Carolina Windom

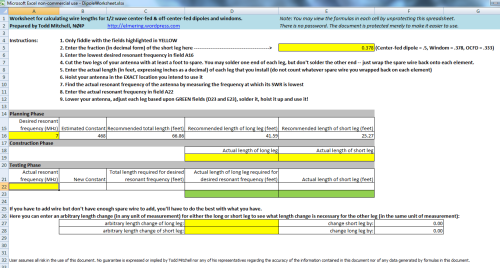
Free! Excel Worksheet for Building Any 1/2 Wave Dipole (Center-Fed, OCF, Windom, New Carolina Windom)

Here is a spreadsheet I designed in Microsoft Excel for calculating the first cut and the final cut (after testing) of a 1/2 wave dipole, whether center-fed, classic off-center-fed, Windom, or New Carolina Windom. If you use it for a plain ol’ center-fed dipole, just ignore the references to “long leg” and “short leg” — the numbers will still be right. Anyhow, you’re welcome to use it, pass it around, whatever:


DipoleWorksheet.xls (Microsoft Excel)

I’d enjoy hearing from any of you who end up using this spreadsheet to build an antenna!

If you find any bugs in this spreadsheet, please let me know. Note that it is protected for your convenience, but you can unprotect it anytime you like to see the formulas in each cell (there is no password).

11 Comments

Filed under Antennas, New Carolina Windom

What’s the Best Way to Hang an Inverted-V OCFD/Windom Antenna?

What is the best way to hang an off-center-fed dipole or windom antenna as an inverted-V? Should you hang the feedpoint at the apex, or hang the center of the antenna at the apex?

From an electrical standpoint the best way is to hang the center at the apex. That is where the current is at a maximum on the lowest resonant frequency. But that leaves all the weight of your balun, coax, and (in the case of a New Carolina Windom) RF choke unsupported by anything but the antenna-wire itself. So from a mechanical standpoint the best way is to hang the feedpoint at the apex, with all that weight hanging straight down from the hanger. Either way it’s a trade-off.

I think it makes sense to hang the feedpoint at the apex if the angle of your V is reasonably broad. The mechanical benefit outweighs the electrical cost in this case. As you can see in this diagram, you really don’t give up much height at the center of the antenna. My own 40m New Carolina Windom, with the longest leg at 74o from vertical, sacrifices only 2.3′ at the center of the antenna. Even if it were cut for 80m the sacrifice would only be 4.5′. A 160m version (I know of one fellow who plans to build one!) would give up almost 9 feet, though. You might want to hang the center at the apex in that case, unless it’s already so high that 9 feet doesn’t matter much. You can always figure out a way to support the feedpoint in some way if you need to.

This changes if you mount your V with a narrow angle. Dropping the longest leg to 45o from vertical would cost me 6′ on my 40m New Carolina Windom! In that case it would probably make more sense to hang the center at the apex.

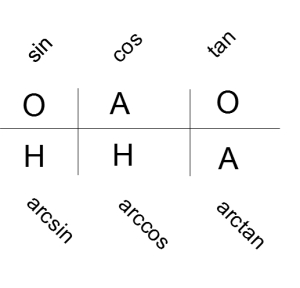
The way to calculate this is shown in the figure above. Notice how I labeled the sides of that triangle with “H” and “A?” Now why did I do that? Glad you asked! The “H” stands for “hypotenuse” and the “A” stands for “adjacent” — adjacent to the angle of 74o in this triangle (your own angle may be different, of course). Just remember this sentence: “Oscar And Ole Have Huge Appetites.” (Up here in Minnesota we all love that name Ole, don’t ya know!) That will help you remember the way to calculate the sine, cosine, tangent, arcsine, arccosine, and arctangent of any angle. “O” stand for opposite (the length of the side opposite the angle you’re dealing with), “A” stands for adjacent, and “H” stands for hypotenuse:

Oscar And Ole Have Huge Appetites!

So to figure out the height of the apex above the center of my antenna, I figure:

A/H = cosine(74o)
A = cosine(74o)*H
A = 0.276*8.5′ = 2.3′

There you go! Of course, you’ll have to know the angle to figure this out. To see an example of that calculation, check out my previous post.

Leave a comment

Filed under Antennas, New Carolina Windom

A Shock-Absorber for a Wire Antenna

Of the three support-points for my wire antenna, one of them has caused me some concern. The end of the longest span of my New Carolina Windom is attached to a rigid, unguyed 12 foot steel mast by a very short length of rope — not nearly long enough to stretch and absorb the shock that a wind-whipped wire might induce in a good storm. Furthermore, this 12 foot mast is set in a small 3′ tripod without any reinforcement below the roof. Obviously this isn’t good enough for a heavy load, but I’m hoping it will suffice to support one end of a 42′ wire. As a precaution, I’ve built a shock-absorber into the system:

This is a spring that I bought at the local hardware store. I didn’t do any calculations to select the thing. I just went through the drawers and handled all the likely-looking springs they had. This one felt about right when I pulled on it. I tied it into the 3/32″ braided dacron/nylon rope with a loop long enough to match the length of the spring when fully extended. The electrical tape is to prevent chafing for as long as it stays on.

The spring is strong enough that on a calm day it doesn’t stretch at all, but it still has plenty of give if the wire gets to whipping around. Will it help this antenna-system weather the storms we get out here in western Minnesota? Time will tell!

Leave a comment

Filed under Antennas

Waterproofing Coaxial Connectors

For a great tutorial on waterproofing coaxial connectors, check out this post by Paul, AE5JU, over at K9ZW’s blog. I didn’t use Scotch 130C Coax Seal like he does since by the time I discovered its existence I was out of time to acquire it for this project. Next time!

[Update: After the helpful comments I received on this from VE3WDM and others at amateurradio.com, I’ve ordered some coax seal and plan to finish the job as soon as it arrives. What I’ve done here is better than nothing — certainly good enough until I can get the good stuff — but it doesn’t afford long-term protection.]

[Update: When I went to put on the coax seal, I discovered my nice pretty electrical tape already coming apart after less than two weeks! Use coax seal! Another thing I’ve learned about is “Magic Tape,” the self-amalgamating silicone tape you can easily find even at stores like Target and Walgreens. Some hams have told me it works great to put over the coax seal.]

What I did do was wrap the connectors with teflon plumber’s tape, then covered it with black 3M electrical tape. The teflon tape is intended simply to keep adhesive from gumming up the connector. I put several layers of electrical tape down and made sure to wrap the last layer up, i.e. toward the sky, so that the turns are stacked like shingles on a house with their seams pointed downward. Here’s a slideshow:

This slideshow requires JavaScript.

3 Comments

Filed under Antennas

RF Choke

UPDATE 9/13/2022: 1) I should have used mix 31, not mix 43 for the beads 2) The PVC is utterly unnecessary

The New Carolina Windom uses part of the feedline as a vertical radiator — the voltage balun used to feed the off-center fed dipole allows common mode current to travel down the feedline. How do you determine how much of the feedline radiates? From what I’ve read, you do this by placing an RF choke (sometimes called a “line isolator”) at some point in the feedline to clamp off the common mode current. For an 80 meter version, you put the RF choke 20 feet below the feedpoint. For a 40 meter version (like I’m building), you put it 10 feet below the feedpoint.

To build my RF choke I followed the instructions provided by Len Carlson, K4IWL. In an addendum published here, Mr. Carlson wrote:

A note about the choke [between the balun and the feedline]: The choke [line-isolator] is simply a straight piece of coax with ferrite cores strung on it. Just use the same coax that you are using for the field line from the Xceiver to the choke. I have made a mod to the choke also. Instead of bending it back inside of the CPVC tube, make it a straight piece of coax about 0.3 meter. The length is not critical but should be no shorter than about 12 inches. Use as many ferrite tubes that will fit in-line on that length.

I built my RF choke using 12 FB-56 ferrite beads (mix 43) from Palomar Engineers strung on a piece of RG-58 coax and secured on each end with wire-ties. While Mr. Carlson chose CPVC for a lighter enclosure, I used PVC. In order for the SO-239 bulkhead-mount coax connectors to fit in the endcaps, I had to go with 1 1/4″ pipe. This did make for a pretty large enclosure — the beaded coax in the pipe does slop around a bit in there when shaken. If I have to do this all over again I’ll figure out some way to secure the innards of this thing (maybe by injecting some expanding foam?). As it was I inserted a few inches of double-sticky foam mounting tape inside the last end to be sealed, which did help somewhat.

I attached one end of the beaded coax directly to an SO-239 connector/end cap, but the other end required several inches of slack to stuff into the tube when it came time to push the final end-cap onto the pipe.

Here is a slideshow of my RF choke. After I took these photos I covered the coax connectors with cling-wrap and spray-painted the whole thing forest green.

This slideshow requires JavaScript.

8 Comments

Filed under New Carolina Windom, RF Chokes

1 KW 4:1 Ruthroff (Voltage) Balun

Building baluns is just about the easiest construction project there is in ham radio. It pays to build your own, too. I’ve read reports from some disappointed hams out there who have paid good money for poor-quality baluns. The ones worth buying might cost you almost twice what you’ll pay to build your own. So I decided to build my own balun for the New Carolina Windom that I’m putting up. The total cost of materials was $40.

The New Carolina Windom is essentially an off-center-fed (OCF) dipole. The big difference is in the balun that you use to feed the antenna. A current balun is the proper choice for an OCF dipole, since it effectively chokes common-mode current from standing on the feedline. But for a New Carolina Windom you want common-mode current on the feedline, since you deliberately use a portion of the feedline as a radiator (an additional RF choke is necessary to clamp off this common-mode current at a certain point on the feedline, but I’ll discuss that in a future post). Therefore, you use a voltage balun, not a current balun. The voltage balun allows some common-mode current to stand on the feedline.

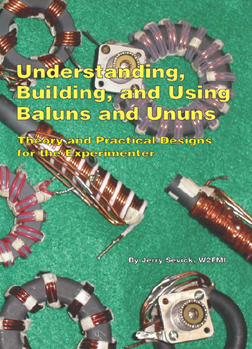
Now, before I go any further I must warn you that I am not an electrical engineer. Baluns are a bit mysterious to me, but from the discussions I’ve read on the internet it seems I’m in good company. If you want to learn more about baluns, I recommend Jerry Sevick’s book, Understanding, Building, and Using Baluns and Ununs, available here. "Understanding, Building, and Using Baluns and Ununs" by Jerry Sevick This book has everything — easy-to-follow instructions for building different kinds of baluns, helpful tips from Sevick’s own experience, as well as some deep discussion of theory that should satisfy even a graduate student of electrical engineering. I followed his instructions for building a 4:1 Ruthroff (voltage) balun.

When building a balun there are several factors you must take into consideration. Do you want it to handle a full kilowatt, or are you willing to be forever limited to QRP? Now, I enjoy QRP (I love my little HW-8!), but I also want to have the option for QRO. Therefore, I chose to use not just one toroid, but two — and to use teflon-coated wire instead of the cheaper stuff you can get away with for QRP. I bought 100 feet of stranded (that’s right, stranded — it works fine!) 14 AWG silver-plated copper teflon-coated wire off of ebay for $34, shipped. That’s enough to build quite a few baluns!

When choosing the wire you’ll use in your balun, you must choose the wire size carefully. The diameter of the conductor and the distance between the center of each conductor determines the impedance of the pair you’re winding around the core. In a 4:1 balun, you want an impedance of 100 ohms. Since impedance around a core is only about 80% of that in free space, that means you want a guage and spacing that gives you 125 ohms. You can use the handy caculator for “Impedance of 2-Wire Transmission Line” at KW2P’s website, or you can figure it out yourself using this formula:

Zo = 276 * log 2(S/D)
S = distance between the centers of the two wires
D = diameter of the wire
Any unit of measurement works (inches, mm) as long as you use the same unit for both S and D.

You’ll notice that the spacing between the wires is critical. I used thin strips of strapping tape to tightly bind the wires together every couple of inches, and watched closely to make sure no gaps appeared as I wound the pair on the toroid.

Another thing you have to decide on is the permeability of the core. There’s lots of debate about this. I followed Sevick’s recommendation to use a permeability of 125 (ferrite mix 61). I purchased my two FT-240-61 cores from kitsandparts.com, stacked them, and taped them together using 3M Scotch glass-fiber strapping tape.

Now, what to put the thing in once you have it wound? The last time I built a balun, I put it in a project-box from Radio Shack. I won’t do that again — the plastic is just too thin. You want something strong enough to stand up to the stress put on the box by the eyebolts that you use to hang the balun and connect the antenna-wire to it. PVC pipe and end-caps are popular, but to house a balun this big it ends up being fairly expensive and downright heavy! I found the perfect solution at Menards for just under $7. It is a weatherproof enclosure made from PVC plastic and comes with a neoprene gasket to seal the cover to the box. I used neoprene washers for all the bolts and sealed all the entry-points (except for the binding posts and the bulkhead SO-239 coax connector) with silicone.

I spent a little time in the hardware store picking out the nuts and bolts for this thing. You want to make sure the bolts don’t work loose, so use lock-washers and lock-nuts where you can. I also used star-washers for each lug that I fastened to a bolt. Star washers have teeth in them that cut into the metal, ensuring a good connection. A fellow at the hardware store also cut me a small square of heavy plexiglass for 50 cents to use for securing the wound toroid inside the box.

When you have built your balun, you can test it by putting a pure-resistive load across the terminals and measuring the SWR across the spectrum you intend to use. For a 4:1 balun, that means a 200 ohm load (4*50=200). The SWR should be 1:1 across the spectrum. Here’s a video showing the test of the balun I built:

It looks good! I’m looking forward to using this balun. If you would like to build one of these and have any questions, ask away. I’ll give you whatever advice I can. Just remember — you’ll get what you pay for!

2 Comments

Filed under Baluns, New Carolina Windom

Antenna-Day #2, in My Son’s Words

I’m afraid we still don’t have the antenna up, but things are looking good to get it done next week. I have lots of stuff to post regarding this project, but that will have to wait until I have more time. In the meantime, here is my son’s account of what we did on Tuesday of this week:

Helping Dad Build His Antenna, Day 2
by Antonio Mitchell, Thursday, October 13, 2011

On Tuesday we began our official work. Dad bought his parts that were on his shopping list and also a titanium drill bit. We kept getting a step closer to finishing our project with each thing we did. It felt good to be getting the project done.

When Dad came home from his shopping trip we began to get ready to go onto the roof. The bolts for [one of] the tripod’s feet were put on, and also the ladder was brought out. We had a bucket which Dad tied some knots to. The bucket was to put things in that would help us put up the tripods. In the bucket were bolts, drill, level, roofing compound, and tape measures. My dad hauled up the first tripod using a rope. Then after that came the bucket.

Once everything was on the roof we set the tripods on each end of the house. We started with the smaller tripod. I made sure it was level and Dad drilled the holes.Once the holes were drilled we spread roofing compound. I helped put the tripod back, while Dad screwed the bolts in. We did the same for the other tripod as well.

After the tripods were on the roof we finished working on the mast. The titanium bit really worked well. It took us till supper-time to finish the tripod and the mast. My dad’s back wasn’t doing well so we did not get to put the mast on the roof. Hopefully soon.

1 Comment

Filed under New Carolina Windom

Antenna-Day #1, in My Son’s Words

As my son’s homeschool teacher I’m giving him plenty of writing assignments this year. Yesterday I asked him to write an essay, and I told him he could write it on anything he wanted. Here’s what he wrote:

Helping Dad Build His Antenna
by Antonio Mitchell, Tuesday, October 11, 2011

My dad has been meaning to build his antenna for his radio for a while. We (my dad and I) finally got motivated and had some free time as well to build the antenna. We began yesterday to build it. Some complications slowed us down.

Yesterday, we went to Wilmar. The first stop was Walmart. When we were in Walmart I got my glasses back. After that we began our search for parts at Menards. It took us a while to find some parts. The whole trip to Wilmar, shopping, and going home took quite a few hours. My dad had to meet with a church member. While he was gone he got a piece of metal cut for the tripod legs.

When he came home several hours later my mom and I were raking leaves. He began to put together a jig to help hold the poles together. We began to drill holes into the poles. It took both of us to do it. The bit finally broke. After supper my dad worked on making a balun. He also made a new shopping list of parts. It will be a great joy to see the antenna up on our roof.

1 Comment

Filed under New Carolina Windom

Enough Planning! It’s Time to Put This Antenna Up!

Hopefully Monday will be an antenna-building day. I don’t know that it will all come together in one shot, but if I don’t get this project going it’s never going to get done.

I spent some time in the hardware store yesterday, picking out the many different bits and pieces that I’ll need for the job. Hard to believe how much it all added up to. Gulp! At least I had a coupon for $10 off of my purchase. As it is there are still a couple more little things I need, but I’ll have to drive up to Willmar for those on Monday.

Here’s a rough sketch that I made last March, dusted off and updated slightly. There are still a couple of unknowns — those are the figures in red.I’m not certain that I’ll need to attach anything to the adjacent church-building, since I may get away with just draping the wire in a nearby tree. But I’ll figure that out as I go. I’ve planned enough! It’s time to put this antenna up!

3 Comments

Filed under New Carolina Windom

Of Pounding Ground Rods and Labeling a Field Box

My arm is tired! I pounded in a ground rod tonight, a stout 8-footer from Fleet Farm. It wouldn’t have been so bad if it had gone in on the first try, but it took me three tries before I found a spot that didn’t have some obstruction about four feet under ground! (Remember I live in Granite Falls. There’s lots of rock around here.) I’m not sure which was harder — swinging the sledge hammer until the rod got stuck, or trying to pull the crazy thing out of the ground when it did. Soaking the ground with water helped to get it out in one instance.

It’s tempting to soak the ground with water before pounding your ground rod in, to make it sink in easier, but I’ve read that you shouldn’t do that as you wind up with a poor connection after the soil dries. As with many other things, the easy way isn’t always the best way.

Anyhow, I finally got it in far enough. There’s about ten inches sticking up out of the ground still, but all I’m doing by swinging at it now is flattening out the top. Once my wife hides it with a hosta plant it will look just fine! I tried pounding in a second one, but when it got stuck and I had to work it out (by clamping vicegrips on it and prying it out with a crowbar, a few inches at a time), I called it a day.

Much easier and more satisfying was labeling the toolbox I’ve converted into a field-kit:I’m asking an awful lot of this decal, sticking it on a pebbled surface. But so far it’s sticking just fine. Randy George, N3ZK, does a great job on these, ships them fast, and the price is right! For only $4.00 (shipping included) you get three of these labels.

In the field box right now is my Heathkit HW-8 and all the accessories necessary to zip out to my picnic table and get on the air with my low-hanging, temporary OCF dipole. Pretty soon it will be too cold to do that comfortably! That’s why I’m pounding ground rods, trying to get my long-awaited New Carolina Windom up and going before the ice and snow comes.

Leave a comment

Filed under Antennas, Portable Operation

Basic CW Operating Procedures

Back when I first got on the air in 1978, CW QSO’s had a pretty standard format. That format didn’t change much until the last few years. But today there’s quite a hodgepodge of operating procedures out there. Most of the time it works, but it’s not uncommon to hear a downright jumbled mess — even from a CW operator who has been on the air long enough to send and receive at 10 wpm or more.

It’s important to learn good operating procedure, not just because it sounds polished but because it serves a practical purpose. You can get away with sloppy operating procedure under perfect conditions, but not if your signal is weak or if there’s much QRM, QRN, and/or QSB. Even under perfect conditions, you’re making the person at the other end work harder if you’re constantly surprising him with your own odd way of operating. Under poor conditions, he may miss some of what you’re trying to say. And even if he succeeds at copying what you’re saying he may well be relieved when the ordeal is over.

I’m not going to get into all of the details of good operating procedure here, but I would like to discuss some basics.

General structure
There is a general structure to a CW QSO that most operators expect. After establishing contact, the first transmission should stick to the basics — RST, QTH, and name. You don’t know yet how well the other fellow is copying you; if you’re a 329, you’re going to torture him if you go on and on about your rig, your power, your antenna, the weather, etc. Furthermore, you might lose the opportunity to hear even the basics from the other fellow if band conditions deteriorate while you’re sending all this on the first transmission. So stick to the basics — and do send them. Here’s the way we all used to do it years ago:

NØART DE NØIP R TNX FER CALL OM BT UR RST RST 579 579 BT QTH QTH GRANITE FALLS, MN GRANITE FALLS, MN BT NAME NAME TODD TODD BT SO HW CPY? AR NØART DE NØIP KN

Note the use of BT. That seems to have fallen out of favor, but once upon a time it was the standard way of changing the subject. The most important thing I want to point out here is to preface each of the three major elements of this first transmission with their labels: RST, QTH, and NAME. It takes a few seconds longer than sending something like, “UR 579 IN GRANITE FALLS, MN OP TODD,” but it is worth it. As the FISTS club puts it, “Accuracy transcends speed.” Update: I have noticed that OP is often used instead of NAME, especially with DX stations. Since it is widely recognized it’s perfectly acceptable.

The operator replying to this first transmission sends the same three basics in the same way. If he’s inclined (and if he’s received a reasonably good RST) he will probably go on to talk about his station, the weather, etc. As it turns into a ragchewing session you can pretty much send whatever you want.

Procedure signals
Just as the use of BT has fallen out of favor, so have other procedure signals fallen on hard times. I often hear them sent incorrectly and used improperly. Remember what these are — they are procedure signals. Learn to send them well and to use them well, and your operating procedure will improve substantially. The ones most commonly used are AR, AS, BK, BT, K, KN and SK.

Notice the line that appears over each one of the two-letter procedure signals. That means you send the two letters as if they are one character. For instance, KN isn’t sent as dah-di-dah dah-dit (KN) but dah-di-dah-dah-dit (KN).

  • AR End of message: Send this after you are completely done sending everything — everything, that is, but call signs and KN. If it’s your last transmission, use SK instead.
  • AS Wait:You might hear this if you’re working an experienced operator. If you hear this, the next thing you hear will probably be silence — maybe he has to answer the phone or something. Or maybe you’ll hear him hold his key down while he fiddles with his antenna tuner. Don’t start sending — he’ll start sending when he’s ready. This is a handy procedure sign to know, if you ever need to take a break yourself.
  • BK Break: This might be used by a station who wants to enter an ongoing QSO — he’ll send BK between transmissions to see if they’ll let him in and turn their QSO into a “roundtable.” With the advent of full QSK keying, this also became popular among experienced CW operators who could interrupt one another right in the middle of a transmission (perhaps to answer a question or clarify something). But most commonly BK is used to rapidly turn the conversation over to the other station without sending any call signs. For instance, an operator might send something like “HOW CPY? BK” and then cease his transmission. If this happens to you, reply by simply sending BK and answer his question. You can go back and forth in this manner for as long as you want, but don’t forget to obey the law by identifying yourself with your call sign at least every 10 minutes.
  • BT Separator: Usually used to change the subject, even if it’s just to go from sending RST to sending QTH. (If you hear the other fellow sending BT several times, it’s because he’s trying to think of what he wants to say next!)
  • K Over: This invites anybody listening to reply. Send this after you’re done calling CQ. But if you’re in a QSO, you almost always want to use KN, not K.
  • KN Over (to specific station): Send this after signing over to the other station in a QSO, e.g. NØART DE NØIP KN. KN tells other listeners that they’re not welcome to call you yet — you just want the station you’ve named to reply. Don’t send this after calling CQ — send K instead.
  • SK End of contact: This lets the other operator know that you want to end this QSO, and this is your last transmission. Usually sent in place of AR right before signing over to the other station.

The Handshake
It has long been customary to send “dit dit” at the very end of a QSO, like a final handshake. On the very last transmisssion, the sending station sends “dit dit” and then the other station replies “dit dit,” and that’s the end. Or (like we did in the old days) you’ll hear the first station send “dit di-di-dit dit” and wait for the second station to send “dit dit” (“shave and a haircut, two bits!”).

But this is often fumbled. Here’s how it usually goes wrong. The first station to send his final farewell, e.g. TNX FER QSO HPE CU AGN 73 73 SK NØART DE NØIP KN, knowing full well that the other station still plans on bidding him farewell in the same manner, goes ahead and sends “dit dit” at the end of his transmission. Naturally, the other station ignores this faux pas, goes on to send his last transmission, and only when he is done does he finally offer “dit dit” for the other operator to send his own “dit dit” again.

Now, this is obviously not the most important point of operating procedure, but why not do it right? No need to be socially awkward at the end of a good QSO!

I’ve only covered a few basics here. For more on CW operating procedures, it’s worth checking out something like http://www.fists.org/basiccw.html. But the best way to learn good operating procedures is simply to pay attention to what proficient operators are doing — especially as you get into more advanced operation, like handling DX pileups. The more listening you do before you wade in, the better operator you will be.

8 Comments

Filed under CW, Operating Practice & Procedure